Configuration Product List Widget On The Storefront (Legacy)
Configuration Product List Widget On The Storefront (Legacy)
Written by Anna George |
Updated
Whats is Legacy?
Legacy themes are non 2.0 Shopify themes. These themes are not built for JSON style templates which enables sections to be used on any page and moved around in any order.
Does this affect me?
When you install one of the three widgets via our app, you choose a theme you wish to use, at which point we tell you if that theme is 2.0 ready or not. If its not a 2.0 theme, a red window will show with a link to this documentation article which explains how to install the widgets manually.
How does installing manually work?
We provide you with two snippets of code. The first snippet is the logic of the widget, and the second snippet is the render (where you wish the widget to show).
Note!
Both of the snippets need to be manually added within your theme code, and because not all themes are built the same it can be challenging for us to give exact instructions on how to achieve this. For additional support with this, please raise a support ticket or contact us via live chat where we can guide and advise you.
Step 1
Make sure you have installed the widget and selected the correct theme within our app.
Step 2
Head over to your Shopify admin panel and select, 'Sales Channels' > 'Online Store' > 'Themes'.
Step 3
Next to the black customise button, sits a little white button with three dots. Click this and choose 'Edit Code'.
Step 4
Now the code editor has opened, on the left hand side you will see a tree of folders and files. A quick tip is to close all the folders to keep it clean.
Then open the 'Snippets' folder.
At the top of this folder section sits a blue link called 'Add a new snippet'.
Click this and give it the name of who_product_manuals_product_list.
Then press the black done button to complete the creation of this snippet file.
Once created, it will automatically open this new created file in the top tab bar.
Now copy and paste the below code snippet directly into your new blank snippet file, and press save (top right hand corner).
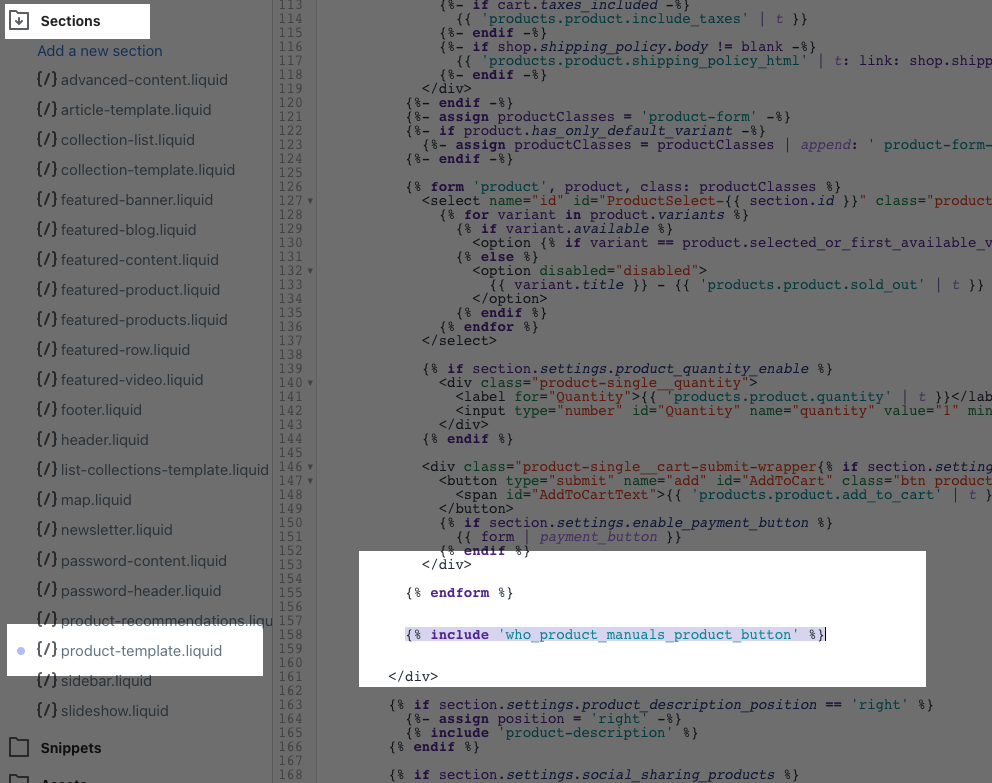
Now comes the hard part. You need to find your product template to add the below snippet to it. This is where the product list will render. The file will often be called something like, product-template.liquid.
Finding this can be challenging as some themes use renders to show the relevant areas.
For example, you may find you product-template file. But the area where you expect to see the buy now buttons doesn't exist, instead says something like {%- render buttons....
In this case, you need to find this render file, as this is likely where you want to add our below snippet.
As a rule of thumb, each product page will show the title, description, price, quantity input, variant selector, followed by the add to cart and buy now buttons. These elements will be wrapped in a {% form %} tag. This is where we recommend to place our below snippet, just after the {% endform %} tag.
Copy and paste this snippet to show our product list in your desired location.
{% render 'who_product_manuals_product_list' %}
Step 6
Testing the product list. Everything should now be up and running, but you need to navigate to a product and variant that you know has an active file in our app, and test the product list is showing and working. If the product list is in the wrong place, you need to move the step 5 snippet around until you get the product list to show in the correct location.
Support
If you are having difficulties manually installing this widget, please raise a support ticket or message us on live chat for assistance.
Did this article answer your question?
Thanks for your feedback. This really helps us improve our helpdesk articles.
Didn't find an answer?
Our team is just an email or live chat conversation away and ready to answer
your questions